
1.线程创建 | 学习集合
[TOC]
概要:...
资料:...
1.线程创建
在 Java 的实现中,有三种方法做到多线程:
继承:
- 定义继承
Thread{}的子类,并且覆盖run(),该方法内部是线程需要做的事情,然后创建该子类的实例后调用start()
- 定义继承
接口:
- 实现
Runnable接口,实现类需要实现内部的run()然后把该实现类的实例作为参数传递给Thread{}构造线程实例,使用线程实例的start() - 实现
Callable<>接口,实现类需要实现内部的call(),然后把该实现类的实例使用Callable<>引用,然后使用FutureTask<>继续封装为“未来任务”,实例化出新实例,交给Thread{}作为构造参数,然后使用对应的线程实例调用start()方法(这种方式最大的好处就是可以使用线程实例的get()获取返回值)
- 实现
lambda:
- 要么通过继承,要么通过接口,这两种方式实现原理都很符合
Java的理念,但是不够简洁,因此可以考虑使用Lambda转化为接口的形式简化编码过程,也就是使用public Thread(Runnable target)构造方法,然后传入一个Runnable lambda表达式。为什么可以把表达式传入构造函数内?因为Thread{}也有Runnable接口的属性,所以Lambda表达式会被构造器转化给run()中,并在用户调用start()方法时调用lambda实现的run() - 同理
Callable<>接口也有类似的Lambda简化方法
- 要么通过继承,要么通过接口,这两种方式实现原理都很符合
重要
补充:一般推荐使用实现 Runnable 接口的方式来创建线程,因为这样更加灵活,可以避免 Java 单继承的限制,并且支持更好的资源共享和代码结构的清晰度。
// 继承 Thread 类的子类
class MyThread extends Thread {
    private String message;

    // 构造方法, 接受需要传递的参数
    public MyThread(String message) {
        this.message = message;
    }

    @Override
    public void run() {
        System.out.println("Thread is running with message: " + message);
        // 线程执行的逻辑
    }
}

public class Main {
    public static void main(String[] args) {
        // 创建线程对象时传递参数
        String msg = "Hello, World!";
        MyThread thread = new MyThread(msg);
        thread.start();
    }
}
// 实现 Runnable 接口的实现类
class MyRunnable implements Runnable {
private String message;
// 设置实例变量的方法
public void setMessage(String message) {
this.message = message;
}
@Override
public void run() {
System.out.println("Runnable is running with message: " + message);
// 线程执行的逻辑
}
}
public class Main {
public static void main(String[] args) {
MyRunnable myRunnable = new MyRunnable();
String msg = "Hello, Runnable!";
// 设置参数
myRunnable.setMessage(msg);
Thread thread = new Thread(myRunnable);
thread.start();
}
}// 实现 Callable 接口的实现类, 并且包装为 FutureTask
import java.util.concurrent.*;
// 实现 Callable 接口的类
class MyCallable implements Callable<String> {
private int num;
// 构造方法, 接收需要的参数
public MyCallable(int num) {
this.num = num;
}
// 实现 call() 定义线程执行的逻辑
@Override
public String call() {
String sum = new String();
for (int i = 1; i <= num; i++) {
sum += i;
}
return sum;
}
}
public class Main {
public static void main(String[] args) throws Exception {
// 创建 Callable 对象
Callable<String> callable = new MyCallable(10); // 使用接口对象引用实现类对象
FutureTask<String> ft = new FutureTask<>(callable); // 然后使用 FutureTask 进行进一步封装为"将来任务"
Thread t = new Thread(ft); // 创建线程
t.start(); // 启动线程
System.out.println("连接结果: " + ft.get()); // 获取线程执行结果
}
}// 使用 Lambda 转化为 Runnable 接口
class UnsafeCounter {
private int count = 0;
public void increment() {
count++; // 非原子操作
}
public int getCount() {
return count; // 非原子操作
}
}
public class Main {
public static void main(String[] args) {
UnsafeCounter counter = new UnsafeCounter();
Runnable r = () -> { // 实际上 Thread{} 也有实现 implements Runnable
for (int i = 0; i < 10000; i++) {
counter.increment();
}
};
// 创建并启动多个线程来增加计数器的值
Thread thread = new Thread(r);
thread.start();
// 等待两个线程完成
try {
thread.join();
} catch (InterruptedException e) {
e.printStackTrace();
}
// 输出最终的计数器值
System.out.println("Final Count: " + counter.getCount());
}
}// 使用 Lambda 转化为 Callable<String> 接口
import java.util.concurrent.Callable;
import java.util.concurrent.FutureTask;
public class Main {
public static void main(String[] args) throws Exception {
int num = 10;
// 使用 Lambda 表达式创建 Callable 对象
Callable<String> callable = () -> {
String sum = "";
for (int i = 1; i <= num; i++) {
sum += i;
}
return sum;
};
// 使用 Lambda 表达式创建 FutureTask 对象
FutureTask<String> ft = new FutureTask<>(callable);
// 创建线程并启动
Thread t = new Thread(ft);
t.start();
// 获取线程执行结果
System.out.println("连接结果: " + ft.get());
}
}重要
补充:抛开线程不谈,这里有一个把 Lambda 转化为接口进行使用的完整例子您可以看一看,对上述的 lambda 实现线程的原理或许有所帮助。
自定义函数接口,首先,定义一个函数接口,例如 Task,它包含一个抽象方法,类似于你希望执行的任务逻辑。
// 自定义函数接口
@FunctionalInterface
public interface Task {
   void execute();
}在构造函数中接受函数接口并实现回调,在 MyTask 类的构造函数中接受这个函数接口作为参数。
// 在构造函数中接受函数接口并实现回调
public class MyTask {
   private Task task;

   public MyTask(Task task) {
       this.task = task;
   }

   public void runTask() {
       // 在这里执行任务逻辑
       task.execute();
   }
}
使用 Lambda 表达式进行实例化,现在可以使用 Lambda 表达式来实现 Task 接口的实例,从而初始化 MyTask 类。
// 使用 Lambda 表达式进行实例化
public class Main {
   public static void main(String[] args) {
       // 使用Lambda表达式初始化MyTask对象
       MyTask myTask = new MyTask(() -> {
           System.out.println("Executing task...");
       });

       // 执行任务
       myTask.runTask();
   }
}
2.线程方法
然后我们开始看 Thread 的其他方法,我们使用第一种方式来演示。
// 使用 Thread 的其他常见方法
// 继承 Thread 类的子类
class MyThread extends Thread {
    private String message;

    // 构造方法, 接受需要传递的参数
    public MyThread(String message) {
        this.message = message;
    }

    @Override
    public void run() {
        System.out.println("线程得到的参数 " + message);

        // 打印线程名称
        System.out.println("线程名 " + this.getName());

        // 打印线程优先级
        System.out.println("线程优先级 " + this.getPriority());

        // 获取当前执行的线程对象
        System.out.println("当前正在执行的线程对象 " + Thread.currentThread());

        // 模拟线程工作
        for (int i = 0; i < 5; i++) {
            System.out.println(this.getName() + " - Count: " + i);
            try {
                Thread.sleep(1000); // 线程休眠 1 秒
            } catch (InterruptedException e) {
                e.printStackTrace();
            }
        }
        System.out.println(this.getName() + " 线程完成执行");
    }
}

public class Main {
    public static void main(String[] args) {
        // 创建线程对象时传递参数
        String msg = "Hello, World!";
        MyThread thread1 = new MyThread(msg);
        thread1.setName("MyThread-1"); // 设置线程名称
        thread1.setPriority(Thread.MAX_PRIORITY); // 设置线程优先级

        // 创建并启动另一个线程
        MyThread thread2 = new MyThread("Another Message");
        thread2.setName("MyThread-2"); // 设置线程名称
        thread2.setPriority(Thread.MIN_PRIORITY); // 设置线程优先级

        // 启动线程
        thread1.start();
        thread2.start();

        // 获取当前执行的线程对象
        System.out.println("当前正在执行的线程对象 " + Thread.currentThread());

        try {
            // 等待线程 1 完成
            thread1.join();
            System.out.println(thread1.getName() + " 已经完成回收");

            // 等待线程 2 完成
            thread2.join();
            System.out.println(thread2.getName() + " 已经完成回收");
        } catch (InterruptedException e) {
            e.printStackTrace();
        }

        // 检查线程是否还在运行
        System.out.println(thread1.getName() + " 是否还在运行 " + thread1.isAlive());
        System.out.println(thread2.getName() + " 是否还在运行 " + thread2.isAlive());
    }
}
3.线程参数
不过还有一件事情值得注意,线程的参数如果直接传递其实是有一些局限性的。
- 当多个线程传递了相同的实例对象时,线程的参数传递会导致被迫共享参数对象,一旦某个线程修改了参数的引用,就会导致其他线程看到修改后的值(或者有的可能会没看到),进而引发数据不一致等意外行为。
- 当调用链中有无法修改源码的第三方库时,我们无法直接修改这些库的方法签名,导致无法将某些我们需要的参数传递到线程中。
因此对于线程内部的参数数据传递,使用 ThreadLocal 是一种常见做法。
ThreadLocal 是 Java 中提供的一种用于 线程局部存储 的机制。它允许每个线程都拥有自己独立的变量副本,从而避免多个线程共享同一个变量。这在多线程环境中非常有用,尤其是当你希望每个线程有独立的数据时,避免线程间的竞争和同步问题。
4.线程安全
先展示一个线程不安全的代码。
// 线程不安全的代码
class UnsafeCounter {
    private int count = 0;

    public void increment() {
        count++;
    }

    public int getCount() {
        return count;
    }
}

public class Main {
    public static void main(String[] args) throws InterruptedException {
        UnsafeCounter counter = new UnsafeCounter();

        // 创建多个线程并发增加计数器
        Thread thread1 = new Thread(() -> {
            for (int i = 0; i < 10000; i++) {
                counter.increment();
            }
        });

        Thread thread2 = new Thread(() -> {
            for (int i = 0; i < 10000; i++) {
                counter.increment();
            }
        });

        thread1.start();
        thread2.start();

        // 等待两个线程执行完成
        thread1.join();
        thread2.join();

        // 输出最终的计数器值(可能小于2000,因为线程不安全)
        System.out.println("Final count (unsafe): " + counter.getCount());
    }
}
4.1.Lock 锁
// 尝试使用 Lock 锁
import java.util.concurrent.locks.Lock;
import java.util.concurrent.locks.ReentrantLock;

class SafeCounterWithLock {
    private int count = 0;
    private Lock lock = new ReentrantLock();

    public void increment() {
        lock.lock(); // 获取锁资源
        try {
            count++;
        } finally {
            lock.unlock(); // 释放锁资源
        }
    }

    public int getCount() {
        lock.lock(); // 获取锁资源
        try {
            return count;
        } finally {
            lock.unlock(); // 释放锁资源
        }
    }
}

public class Main {
    public static void main(String[] args) throws InterruptedException {
        SafeCounterWithLock counter = new SafeCounterWithLock();

        Thread thread1 = new Thread(() -> {
            for (int i = 0; i < 10000; i++) {
                counter.increment();
            }
        });

        Thread thread2 = new Thread(() -> {
            for (int i = 0; i < 10000; i++) {
                counter.increment();
            }
        });

        thread1.start();
        thread2.start();

        thread1.join();
        thread2.join();

        System.out.println("Final count (with lock): " + counter.getCount());
    }
}
4.2.同步代码块
// 尝试使用同步代码块
class SafeCounterSyncBlock {
    private int count = 0;

    public void increment() {
        synchronized (this) { // 这里就使用了同步代码块, 保证同一时刻只有一个线程可以调用这个方法
            count++;
        }
    }

    public int getCount() {
        synchronized (this) {  // 这里就使用了同步代码块, 保证同一时刻只有一个线程可以调用这个方法
            return count;
        }
    }
}

public class Main {
    public static void main(String[] args) throws InterruptedException {
        SafeCounterSyncBlock counter = new SafeCounterSyncBlock();

        Thread thread1 = new Thread(() -> {
            for (int i = 0; i < 10000; i++) {
                counter.increment();
            }
        });

        Thread thread2 = new Thread(() -> {
            for (int i = 0; i < 10000; i++) {
                counter.increment();
            }
        });

        thread1.start();
        thread2.start();

        thread1.join();
        thread2.join();

        System.out.println("Final count (sync block): " + counter.getCount());
    }
}
吐槽:在
Java中同步代码块将同步的关注点从线程上转移到了代码块(或对象)上,这种方式的实现和底层操作系统的线程锁定(如Linux中的锁资源竞争)是有些不同的。
4.3.同步方法
// 尝试使用同步方法
class SafeCounterSyncMethod {
    private int count = 0;

    public synchronized void increment() {
        count++;
    }

    public synchronized int getCount() {
        return count;
    }
}

public class Main {
    public static void main(String[] args) throws InterruptedException {
        SafeCounterSyncMethod counter = new SafeCounterSyncMethod();

        Thread thread1 = new Thread(() -> {
            for (int i = 0; i < 10000; i++) {
                counter.increment();
            }
        });

        Thread thread2 = new Thread(() -> {
            for (int i = 0; i < 10000; i++) {
                counter.increment();
            }
        });

        thread1.start();
        thread2.start();

        thread1.join();
        thread2.join();

        System.out.println("Final count (sync method): " + counter.getCount());
    }
}
补充:三种方法主要区别就是颗粒度不同。
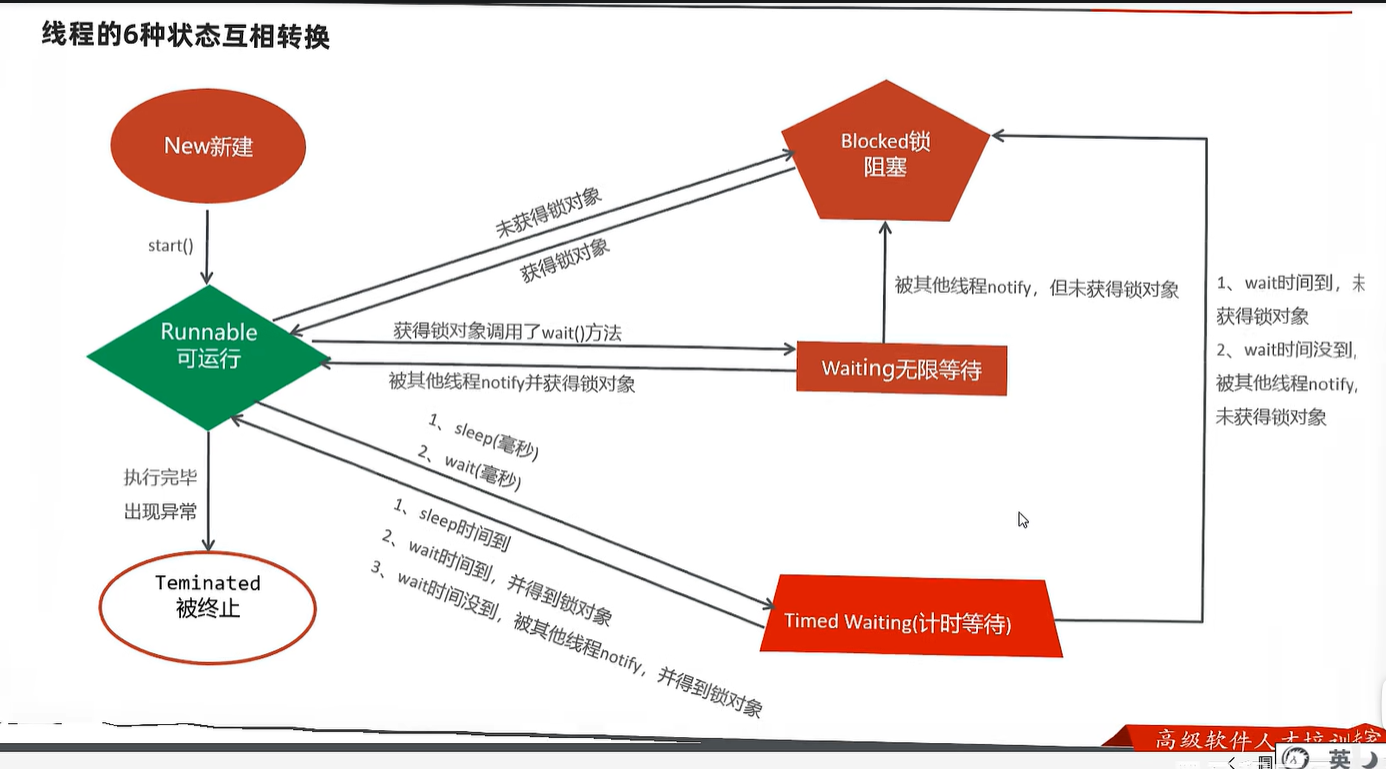
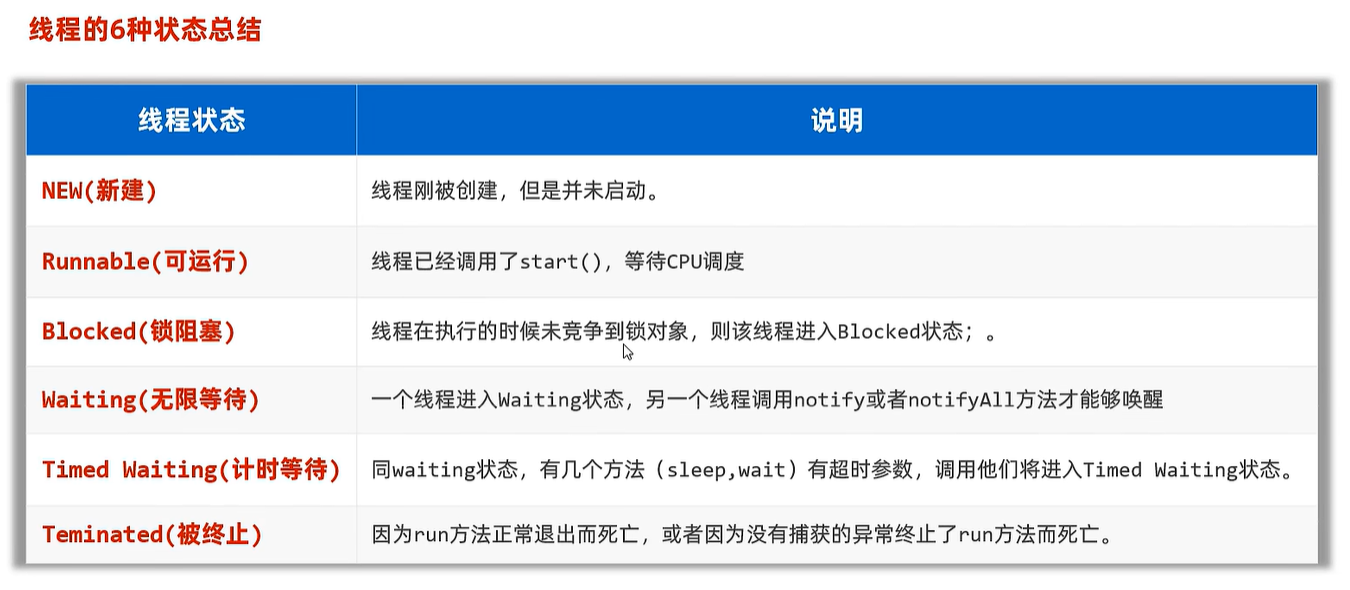
5.线程状态
6.线程通信
貌似这里的很奇怪...还有唤醒的问题...
7.线程池化
您当然可以使用 ExecutorService 的实现类自己实现一个线程池类。
// 尝试使用 ExecutorService
import java.util.concurrent.ExecutorService;
import java.util.concurrent.Executors;

public class Main {
    public static void main(String[] args) {
        // 创建一个固定大小的线程池
        ExecutorService executor = Executors.newFixedThreadPool(5); // 设置线程个数, 内部就会自动启动线程开始等待

        // 提交 10 个任务给线程池
        for (int i = 0; i < 10; i++) {
            executor.execute(() -> {  // 执行...这里的 Lambda 表达式实现了 Runnable 接口
                System.out.println(Thread.currentThread().getName() + " Start.");
                for (int j = 0; j < 100; j++) {
                    System.out.println(j);
                }
                System.out.println(Thread.currentThread().getName() + " End.");
            });
        }

        // 关闭线程池
        executor.shutdown();
        while (!executor.isTerminated()) {
        }
    }
}
结语:...