
搜索框架
1.全面概述
Elasticsearch 是一个分布式、开源的搜索引擎,专门用于处理大规模的数据搜索和分析。它基于 Apache Lucene 构建,具有实时搜索、分布式计算和高可扩展性,广泛用于全文检索、日志分析、监控数据分析等场景,可以阅读一下官方文档。
2.基本功能
基本上我们使用一种叫作分词器的东西在控制面板上对 Elasticsearch 进行操作。
3.快速使用
3.1.核心组件
3.1.1.Elasticsearch
Elasticsearch 生态系统非常丰富,包含了一系列工具和功能,帮助用户处理、分析和可视化数据,Elastic Stack(也称为 ELK Stack) 是其核心组成部分,由几个部分组成。最核心的部分就是 Elasticsearch,是核心的搜索引擎,负责存储数据、索引数据、搜索数据。
3.1.2.Kibana
可视化平台,用于查询、分析、展示 Elasticsearch 中的数据,是 Elastic Stack 的可视化组件,允许用户通过图表、地图和仪表盘来展示存储在 Elasticsearch 中的数据。它提供了简单的查询接口、数据分析和实时监控功能。
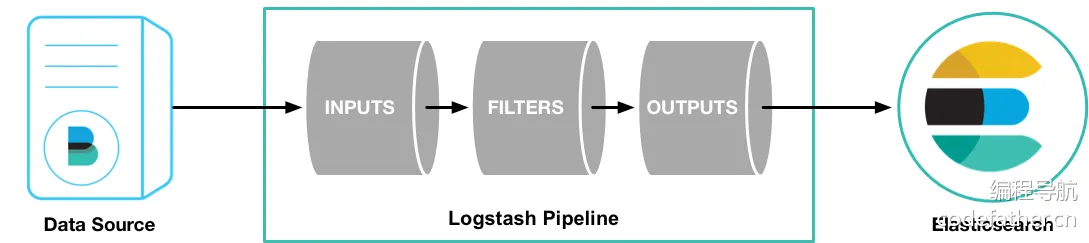
3.1.3.Logstash
负责数据处理管道,负责数据收集、数据过滤、数据增强、数据传输到 Elasticsearch。是一个强大的数据收集管道工具,能够从多个来源收集、过滤、转换数据,然后将数据发送到 Elasticsearch,Logstash 支持丰富的输入插件、过滤插件、输出插件。
3.1.4.Beats
轻量级的数据传输工具,收集和发送数据到 Logstash 或 Elasticsearch。作为轻量级的数据采集代理,负责从不同来源收集数据并发送到 Elasticsearch 或 Logstash。常见的 Beats 包括:
Filebeat:收集日志文件Metricbeat:收集系统和服务的指标Packetbeat:监控网络流量

3.2.组件部署
我们采用 Docker 进行部署,由于我自己的项目用的 Spring Boot 2.x 版本,对应的 Spring Data Elasticsearch 客户端版本是 4.x,支持的 Elasticsearch 是 7.x,所以建议 Elasticsearch 使用 7.x 的版本。由于我这里使用的是 Sping Boot 2.7.2.,推荐 部署 Elasticsearch 7.17。我个人偏爱 Docker,基本上能使用 Docker 解决的部署问题我都会使用 Docker,因此我们需要先 sudo docker pull docker.elastic.co/elasticsearch/elasticsearch:7.17.28,然后编写配置文件 docker-compose.yaml,然后参考 这个文档 进行部署,我们部署个单机就足够了。
  # 服务
  services:
  ## Elasticsearch
  work-elasticsearch:
    image: docker.elastic.co/elasticsearch/elasticsearch:7.17.28
    container_name: work-elasticsearch
    restart: always
    ports:
      - "9200:9200"
    environment:
      - discovery.type=single-node # 表示单机部署
      - xpack.security.enabled=true # 开启认证
      - ELASTIC_PASSWORD=Qwe54188_ # 提供密码进行认证
      - ES_JAVA_OPTS=-Xms4g -Xmx4g # 设置内存限制, 否则您的主机可能顶不住
    networks:
      - work-network
    mem_limit: 5g # entrypoint 执行的是容器启动时始终执行的主程序, 下面安装了一个插件
    entrypoint: >
      sh -c "
        if [ ! -d /usr/share/elasticsearch/plugins/analysis-ik ]; then
          echo 'Installing IK plugin...';
          elasticsearch-plugin install --batch https://release.infinilabs.com/analysis-ik/stable/elasticsearch-analysis-ik-7.17.28.zip;
        fi;
        exec docker-entrypoint.sh
      "

# 网络
networks:
  work-network:
    name: work-network
然后使用 sudo docker-compose up -d work-elasticsearch 即可快速启动,可使用 curl -X GET "localhost:9200/?pretty" 来进行测试。
$ curl -X GET "localhost:9200/?pretty"
{
  "name" : "9ffcfd197f5f",
  "cluster_name" : "docker-cluster",
  "cluster_uuid" : "4jdj3x2eRvqhZ0L3Eh-TBw",
  "version" : {
    "number" : "7.17.28",
    "build_flavor" : "default",
    "build_type" : "docker",
    "build_hash" : "139cb5a961d8de68b8e02c45cc47f5289a3623af",
    "build_date" : "2025-02-20T09:05:31.349013687Z",
    "build_snapshot" : false,
    "lucene_version" : "8.11.3",
    "minimum_wire_compatibility_version" : "6.8.0",
    "minimum_index_compatibility_version" : "6.0.0-beta1"
  },
  "tagline" : "You Know, for Search"
}
不过我们还需要另外一个重要的组件,就是 Kibana 可视化平台,可以 根据部署文档进行部署,我依旧是 采用 Docker 的部署方式,首先需要拉取 sudo docker pull docker.elastic.co/kibana/kibana:7.17.28,然后还是给出 docker-compose.yaml 文件。
  # 服务
  services:
  ## Elasticsearch
  work-elasticsearch:
    image: docker.elastic.co/elasticsearch/elasticsearch:7.17.28
    container_name: work-elasticsearch
    restart: always
    ports:
      - "9200:9200"
    environment:
      - discovery.type=single-node # 表示单机部署
      - xpack.security.enabled=true # 开启认证
      - ELASTIC_PASSWORD=Qwe54188_ # 提供密码进行认证
      - ES_JAVA_OPTS=-Xms4g -Xmx4g # 设置内存限制, 否则您的主机可能顶不住
    networks:
      - work-network
    mem_limit: 5g # entrypoint 执行的是容器启动时始终执行的主程序, 下面安装了一个插件
    entrypoint: >
      sh -c "
        if [ ! -d /usr/share/elasticsearch/plugins/analysis-ik ]; then
          echo 'Installing IK plugin...';
          elasticsearch-plugin install --batch https://release.infinilabs.com/analysis-ik/stable/elasticsearch-analysis-ik-7.17.28.zip;
        fi;
        exec docker-entrypoint.sh
      "

  ## Kibana
  work-kibana:
    image: docker.elastic.co/kibana/kibana:7.17.28
    container_name: work-kibana
    restart: always
    ports:
      - "5601:5601"
    environment:
      - ELASTICSEARCH_HOSTS=http://work-elasticsearch:9200 # 对接搜索引擎
      - ELASTICSEARCH_USERNAME=elastic # 提供用户进行认证
      - ELASTICSEARCH_PASSWORD=Qwe54188_ # 提供密码进行认证
    networks:
      - work-network

# 网络
networks:
  work-network:
    name: work-network
然后使用 sudo docker-compose up -d work-kibana 快速部署,最后访问 http://127.0.0.1:5601 即可得到控制台。
重要
补充:您可以在容器内部的 /usr/share/kibana/config/kibana.yml 末尾添加 i18n.locale: "zh-CN" 即可实现汉化控制台。
尝试利用 Kibana 的开发工具来操作 Elasticsearch 的数据,比如查询操作。
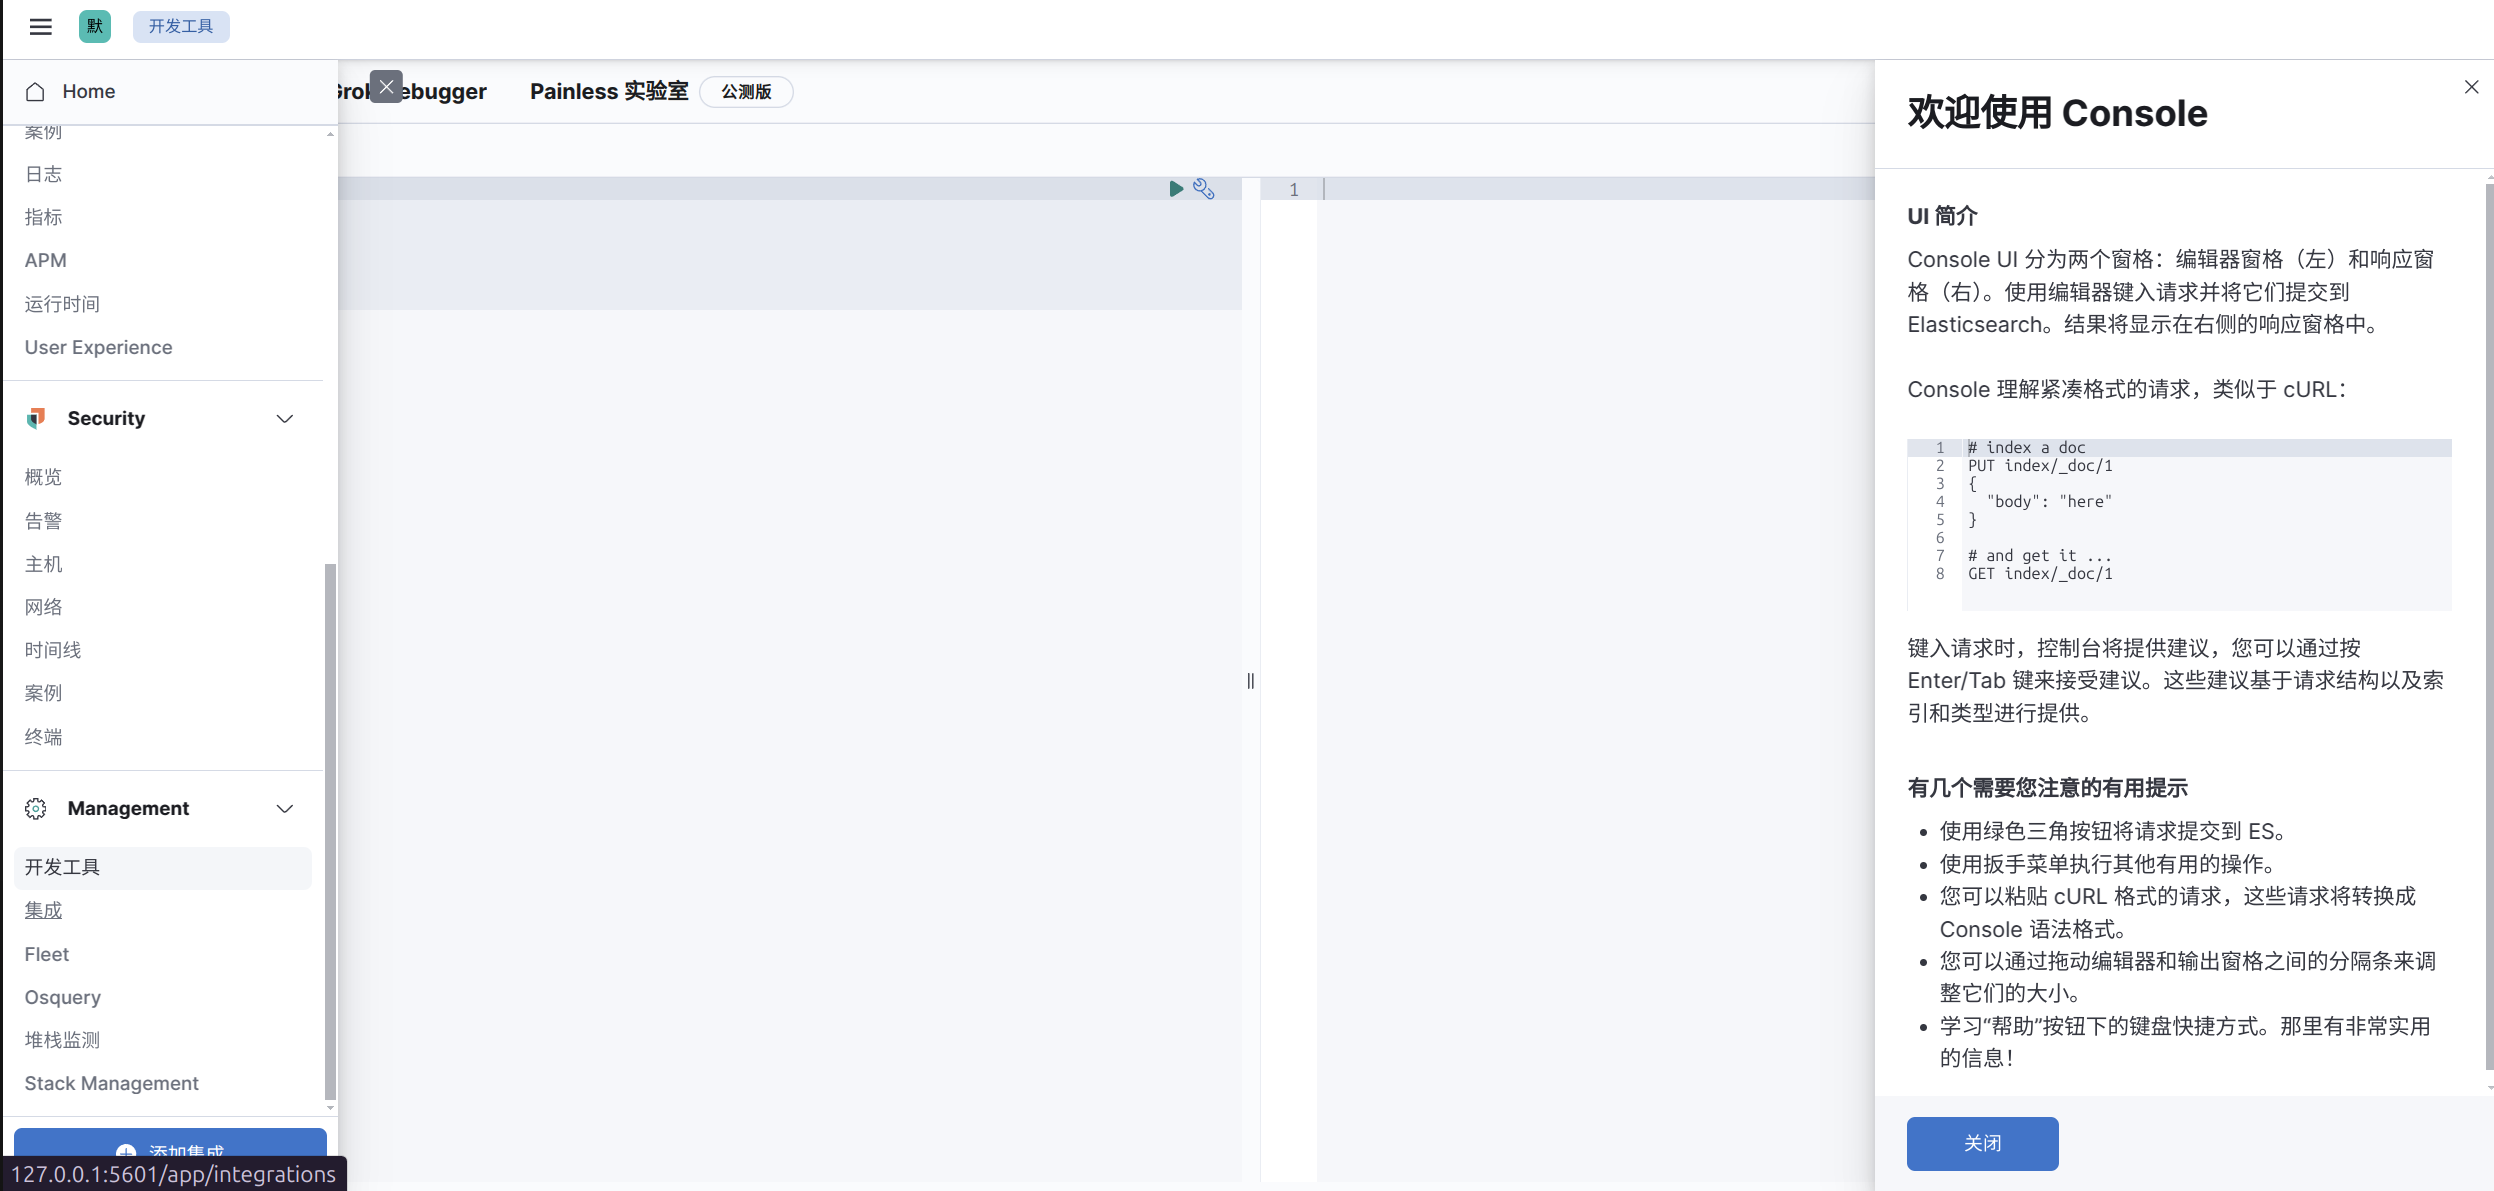
然后输入分词器配置。
POST /_analyze
{
  "analyzer": "standard",
  "text": "缡墨是一位开发者。"
}
可以看到对中文的分词是比较糟糕的,因为标准的分词器 standard 只支持英文,我们需要使用对中文进行优化的分词器,不过可惜的是以下默认安装的分词器都不支持中文:
standard:标准分词器simple:简单分词器whitespace:按空格分词stop:带停用词的分词器keyword:不分词,将整个字段作为一个词条pattern:基于正则表达式的分词器ngram和edge_ngram:n-gram分词器
我们需要安装 IK 中文分词器(ES 插件),其实只需要执行 .\bin\elasticsearch-plugin.bat install https://release.infinilabs.com/analysis-ik/stable/elasticsearch-analysis-ik-7.17.23.zip 就可以了,不过在 Docker 环境中该怎么做呢?很简单,在 ES 启动的时候运行这个指令即可,我们前面的配置文件已经做了这个事情,因此下面就可以直接使用了。IK 分词器插件为我们提供了两个分词器,ik_smart 和 ik_max_word:
ik_smart是智能分词,尽量选择最像一个词的拆分方式,比如“好学生”会被识别为一个词,适用于 搜索分词,即在查询时使用,保证性能的同时提供合理的分词精度。ik_max_word尽可能地分词,可以包括组合词,比如“好学生”会被识别为3个词:好学生、好学、学生,适用于 底层索引分词,确保在建立索引时尽可能多地分词,提高查询时的匹配度和覆盖面。

效果还不错。
3.3.快速使用
3.3.1.索引操作
分词器的语法我们可以慢慢来研究,不过有一个重要的问题,ES 需要读取 MySQL 中的数据才能进开始进行分词,而不是我们在控制台中执行。而 MySQL 中的数据是有可能变动的,因此我们就需要全量更新和增量更新。为了将 MySQL 题目表数据导入到 ES 中并实现分词搜索,需要为 ES 索引定义 mapping。ES 的 mapping 用于定义字段的类型、分词器及其索引方式,含义类似 MySQL 的数据表。
既然是类似数据库概念,那么就需要学习字段的类型,我们对项目中的用户数据进行一个索引 mapping 的制作,我们的主要目标是分词搜索用户的标识、帐号、简介、名字、昵称、地址。
| 字段类型 | 描述 | 示例用途 |
|---|---|---|
text | 用于存储需要分词的字符串,适合全文搜索 | 文章内容、评论 |
keyword | 用于存储不分词的字符串,适合精确匹配 | ID、标签、电子邮件 |
long | 用于存储 64 位整数 | 年份、ID、计数器 |
integer | 用于存储 32 位整数 | 小范围整数 |
short | 用于存储 16 位整数 | 较小的整数 |
byte | 用于存储 8 位整数 | 非常小的整数 |
double | 用于存储双精度浮动数值 | 浮动小数点数 |
float | 用于存储单精度浮动数值 | 较小精度的浮动数值 |
boolean | 用于存储布尔值(true 或 false) | 状态开关、是否启用 |
date | 用于存储日期和时间,支持多种日期格式 | 时间戳、日期字段 |
object | 用于存储嵌套的 JSON 对象,可以存储多个字段 | 地址、用户资料 |
nested | 用于存储数组中嵌套的对象,支持多级嵌套和嵌套查询 | 订单项、嵌套数据结构 |
range | 用于存储数值范围(如日期范围、数值范围等) | 日期范围、数值范围 |
geo_point | 用于存储地理坐标(经度、纬度),支持空间查询 | 地理位置、距离查询 |
geo_shape | 用于存储更复杂的地理形状(如多边形、线条等) | 多边形区域、复杂形状查询 |
ip | 用于存储 IP 地址,支持 IP 匹配查询 | IP 地址、CIDR 匹配 |
binary | 用于存储二进制数据,适用于图像、音频等文件 | 图像文件、音频文件 |
token_count | 用于存储文本字段中的词项数量 | 文本字段长度统计 |
version | 用于存储版本信息,常用于版本控制 | 软件版本 |
flattened | 用于存储多键值对,适合存储动态字段 | 动态数据、变化的字段结构 |
wildcard | 用于支持模糊匹配(* 或 ?)的字符串字段 | 模糊匹配查询 |
scaled_float | 用于存储以某个比例缩放的浮动数值,通常用于财务或计数数据 | 财务数据、精度缩放的计数数据 |
PUT /work_user_centre
{
  "mappings": {
    "properties": {
      "account": {
        "type": "text",
        "analyzer": "ik_max_word",
        "search_analyzer": "ik_smart",
        "index": true
      },
      "wx_union": {
        "type": "keyword",
        "index": true
      },
      "mp_open": {
        "type": "keyword",
        "index": true
      },
      "email": {
        "type": "keyword",
        "index": true
      },
      "phone": {
        "type": "keyword",
        "index": true
      },
      "ident": {
        "type": "keyword",
        "index": true
      },
      "passwd": {
        "type": "keyword",
        "index": false
      },
      "avatar": {
        "type": "keyword",
        "index": false
      },
      "tags": {
        "type": "keyword",
        "index": true
      },
      "nick": {
        "type": "text",
        "analyzer": "ik_max_word",
        "search_analyzer": "ik_smart",
        "index": true
      },
      "name": {
        "type": "text",
        "analyzer": "ik_max_word",
        "search_analyzer": "ik_smart",
        "index": true
      },
      "profile": {
        "type": "text",
        "analyzer": "ik_max_word",
        "search_analyzer": "ik_smart",
        "index": true
      },
      "birthday": {
        "type": "date",
        "format": "yyyy-MM-dd",
        "index": true
      },
      "country": {
        "type": "keyword",
        "index": true
      },
      "address": {
        "type": "text",
        "analyzer": "ik_max_word",
        "search_analyzer": "ik_smart",
        "index": true
      },
      "role": {
        "type": "integer",
        "index": true
      },
      "level": {
        "type": "integer",
        "index": true
      },
      "gender": {
        "type": "integer",
        "index": true
      },
      "deleted": {
        "type": "keyword",
        "index": true
      },
      "create_time": {
        "type": "date",
        "format": "yyyy-MM-dd HH:mm:ss"
      },
      "update_time": {
        "type": "date",
        "format": "yyyy-MM-dd HH:mm:ss"
      }
    }
  }
}
有几个事情需要说明一下:
- 在
ES中,每个文档都有一个唯一的_id字段来标识文档,该字段用于文档的主键索引和唯一标识。通常,开发者并不需要显式定义id字段,因为ES会自动生成_id,或者在插入数据时,您可以手动指定_id。 "analyzer": "ik_max_word"指定了这个字段使用的分词器(analyzer)是ik_max_word,ik_max_word是IK分词器的一种配置,适用于最大化分词的精度,将文本拆分为更多的词项。用于细粒度的分词,能够将句子拆分成更多的词汇,这对于搜索时的精确匹配有帮助。"search_analyzer": "ik_smart":指定了一个不同的分词器ik_smart用于搜索时的分析。ik_smart是另一种分词模式,它会使用较少的词汇进行分词,通常适用于短文本或者对搜索精度要求不那么高的场景。这个设置的目的是在搜索过程中使用ik_smart来减少分词数量,从而提高查询效率,同时避免不必要的复杂性。"index": true是ES中的一个字段设置,它的作用是决定该字段是否需要被索引。默认情况下,字段是会被索引的,但在某些情况下,您可以显式地设置它为false,来禁用该字段的索引功能。deleted使用keyword类型,表示是否被删除。 因为keyword是为精确匹配设计的,适用于枚举值精确查询的场景,性能好且清晰。为什么不用boolean类型呢?因为MySQL数据库存储的是0和1,写入ES时需要转换类型。createTime、updateTime时间字段被定义为date类型,并指定了格式"yyyy-MM-dd HH:mm:ss"。这样做的好处是ES可以基于这些字段进行时间范围查询、排序和聚合操作,如按时间过滤或统计某时间段的数据。- 在
ES中,所有的字段类型(包括keyword和text)默认都支持数组。你可以直接插入一个包含多个值的数组,ES会自动将其视为多个值的集合。在查询时,ES会将数组中的每个值视为独立的keyword,可以进行精确匹配,例如上面的tags字段。
重要
补充:但是有一点要注意,推荐在创建索引时添加 alias(别名) ,因为它提供了灵活性和简化索引管理的能力。具体原因如下:
- 零停机切换索引:在更新索引或重新索引数据时,你可以创建一个新索引并使用
alias切换到新索引,而不需要修改客户端查询代码,避免停机或中断服务。 - 简化查询:通过
alias,可以使用一个统一的名称进行查询,而不需要记住具体的索引名称(尤其当索引有版本号或时间戳时)。 - 索引分组:
alias可以指向多个索引,方便对多个索引进行联合查询,例如用于跨时间段的日志查询或数据归档。
因此完整的创建映射的 json 结构如下,需要在刚刚的控制台中执行:
PUT /user_v1
{
  "aliases": {
    "user": {}
  },
  "mappings": {
    "properties": {
      "account": {
        "type": "text",
        "analyzer": "ik_max_word",
        "search_analyzer": "ik_smart",
        "index": true
      },
      "wx_union": {
        "type": "keyword",
        "index": true
      },
      "mp_open": {
        "type": "keyword",
        "index": true
      },
      "email": {
        "type": "keyword",
        "index": true
      },
      "phone": {
        "type": "keyword",
        "index": true
      },
      "ident": {
        "type": "keyword",
        "index": true
      },
      "passwd": {
        "type": "keyword",
        "index": false
      },
      "avatar": {
        "type": "keyword",
        "index": false
      },
      "tags": {
        "type": "keyword",
        "index": true
      },
      "nick": {
        "type": "text",
        "analyzer": "ik_max_word",
        "search_analyzer": "ik_smart",
        "index": true
      },
      "name": {
        "type": "text",
        "analyzer": "ik_max_word",
        "search_analyzer": "ik_smart",
        "index": true
      },
      "profile": {
        "type": "text",
        "analyzer": "ik_max_word",
        "search_analyzer": "ik_smart",
        "index": true
      },
      "birthday": {
        "type": "date",
        "format": "yyyy-MM-dd",
        "index": true
      },
      "country": {
        "type": "keyword",
        "index": true
      },
      "address": {
        "type": "text",
        "analyzer": "ik_max_word",
        "search_analyzer": "ik_smart",
        "index": true
      },
      "role": {
        "type": "integer",
        "index": true
      },
      "level": {
        "type": "integer",
        "index": true
      },
      "gender": {
        "type": "integer",
        "index": true
      },
      "deleted": {
        "type": "keyword",
        "index": true
      },
      "create_time": {
        "type": "date",
        "format": "yyyy-MM-dd HH:mm:ss"
      },
      "update_time": {
        "type": "date",
        "format": "yyyy-MM-dd HH:mm:ss"
      }
    }
  }
}
响应为:
{
  "acknowledged" : true,
  "shards_acknowledged" : true,
  "index" : "user_v1"
}
3.3.2.文档操作
ES 支持多种类型的客户端:
- HTTP API:
ES提供了RESTful HTTP API,用户可以通过直接发送HTTP请求来执行索引、搜索和管理集群的操作。 - Kibana:
Kibana是ES官方提供的可视化工具,用户可以通过Kibana控制台使用查询语法(如DSL、KQL)来执行搜索、分析和数据可视化。 - Java REST Client:
ES官方提供的Java高级REST客户端库,用于Java程序中与Elasticsearch进行通信,支持索引、查询、集群管理等操作。 - Spring Data Elasticsearch:
Spring全家桶的一员,用于将Elasticsearch与Spring框架集成,通过简化的Repository方式进行索引、查询和数据管理操作。 - Elasticsearch SQL CLI:命令行工具,允许通过类
SQL语法直接在命令行中查询Elasticsearch数据,适用于熟悉SQL的用户。
这里以 Spring Boot 为例子,使用
<!-- elasticsearch: https://www.elastic.co/docs/get-started/ -->
<dependency>
    <groupId>org.springframework.boot</groupId>
    <artifactId>spring-boot-starter-data-elasticsearch</artifactId>
</dependency>
再添加配置文件配置:
spring:
  elasticsearch:
    uris: http://127.0.0.1:9200
    username: elastic
    password: Qwe54188_
使用 Spring Data Elasticsearch 提供的 Bean 即可操作 Elasticsearch,我们可以直接通过 @Resource 注解引入,注入后根据我们创建的索引插入文档,对 ES 文档进行一些操作。
package cn.com.edtechhub.workusercentre;

import lombok.Data;
import lombok.extern.slf4j.Slf4j;
import org.elasticsearch.index.query.QueryBuilders;
import org.springframework.boot.CommandLineRunner;
import org.springframework.boot.SpringApplication;
import org.springframework.boot.autoconfigure.SpringBootApplication;
import org.springframework.data.annotation.Id;
import org.springframework.data.elasticsearch.annotations.Document;
import org.springframework.data.elasticsearch.annotations.Field;
import org.springframework.data.elasticsearch.annotations.FieldType;
import org.springframework.data.elasticsearch.core.ElasticsearchRestTemplate;
import org.springframework.data.elasticsearch.core.SearchHit;
import org.springframework.data.elasticsearch.core.SearchHits;
import org.springframework.data.elasticsearch.core.mapping.IndexCoordinates;
import org.springframework.data.elasticsearch.core.query.IndexQuery;
import org.springframework.data.elasticsearch.core.query.IndexQueryBuilder;
import org.springframework.data.elasticsearch.core.query.NativeSearchQueryBuilder;
import org.springframework.data.elasticsearch.core.query.Query;

import javax.annotation.Resource;
import java.util.List;
import java.util.stream.Collectors;

@SpringBootApplication
@Slf4j
public class Test implements CommandLineRunner {

    public static void main(String[] args) {
        SpringApplication.run(Test.class, args);
    }

    @Resource
    private ElasticsearchRestTemplate elasticsearchRestTemplate;

    @Override
    public void run(String... args) throws Exception {
        User user = new User();
        user.setId(1L); // 使用 Long 类型ID
        user.setAccount("testUser");
        user.setNick("limou3434");
        user.setName("缡墨");
        user.setProfile("我是一名测试用户");
        user.setAddress("广州白云区");
        user.setTags(1001);

        // 1. 创建文档
        addUser(user);

        // 2. 查询文档(根据 id)
        searchById(user.getId());

        // 3. 查询文档(根据 account)
        searchByAccount(user.getAccount());

        // 4. 更新文档
        updateUserProfile(user.getId());

        // 5. 删除文档
        // deleteUser(user.getId()); // 可以先别删除在 kibana 中查看一下
        /*
        可以使用下面 json 在 kibana 中查看
        GET /user_v1/_doc/1
         */
    }

    private User addUser(User user) {
        IndexQuery indexQuery = new IndexQueryBuilder()
                .withId(user.getId().toString()) // 显式转为String
                .withObject(user)
                .build();

        String documentId = elasticsearchRestTemplate.index(indexQuery, IndexCoordinates.of("user_v1"));
        log.info("新增文档成功, ID: {}", documentId);
        return user;
    }

    private void searchById(Long id) {
        // 关键修改点:使用Long类型查询
        User user = elasticsearchRestTemplate.get(id.toString(), User.class, IndexCoordinates.of("user_v1"));
        log.info("根据 id 查询结果: {}", user);
    }

    private void searchByAccount(String account) {
        Query query = new NativeSearchQueryBuilder()
                .withQuery(QueryBuilders.matchQuery("account", account))
                .build();

        SearchHits<User> searchHits = elasticsearchRestTemplate.search(query, User.class);
        List<User> users = searchHits.stream()
                .map(SearchHit::getContent)
                .collect(Collectors.toList());

        log.info("根据 account 查询到 {} 条结果: {}", users.size(), users);
    }

    private void updateUserProfile(Long id) {
        User user = elasticsearchRestTemplate.get(id.toString(), User.class, IndexCoordinates.of("user_v1"));
        if (user != null) {
            user.setProfile("更新后的用户简介 [" + System.currentTimeMillis() + "]");

            IndexQuery updateQuery = new IndexQueryBuilder()
                    .withId(user.getId().toString())
                    .withObject(user)
                    .build();

            String updatedId = elasticsearchRestTemplate.index(updateQuery, IndexCoordinates.of("user_v1"));
            log.info("更新文档成功, id: {}", updatedId);
            /*
            可以使用下面 json 在 kibana 中查看
            GET /user_v1/_search
            {
              "query": {
                "match_all": {}
              }
            }
             */
        } else {
            log.warn("未找到 id 为 {} 的文档", id);
        }
    }

    private void deleteUser(Long id) {
        String deletedId = elasticsearchRestTemplate.delete(id.toString(), IndexCoordinates.of("user_v1"));
        log.info("删除文档成功,ID: {}", deletedId);
    }
}

@Data
@Document(indexName = "user_v1") // 由于我们最主要的还是根据下面几个字段来查询, 所以其他字段我暂时不考虑
class User {

    @Id
    private Long id; // 标识

    @Field(type = FieldType.Text, analyzer = "ik_max_word", searchAnalyzer = "ik_smart")
    private String account; // 帐号

    @Field(type = FieldType.Keyword)
    private Integer tags; // 标签

    @Field(type = FieldType.Text, analyzer = "ik_max_word", searchAnalyzer = "ik_smart")
    private String nick; // 昵称

    @Field(type = FieldType.Text, analyzer = "ik_max_word", searchAnalyzer = "ik_smart")
    private String name; // 名字

    @Field(type = FieldType.Text, analyzer = "ik_max_word", searchAnalyzer = "ik_smart")
    private String profile; // 简介

    @Field(type = FieldType.Text, analyzer = "ik_max_word", searchAnalyzer = "ik_smart")
    private String address; // 地址

}
重要
补充:建议 好好阅读这篇文档。
可能您会发现这种开发模式有点眼熟,没错 ElasticsearchRestTemplate 就是有点类似基于 JDBC 的 JdbcTemplate,不过我们倚仗 MyBatisPlus,成功不用编写过多的代码,最终达到从 entity->service->controller 的模式,那么 ES 有没有办法书写 Dao 层呢?有的,官方支持 Spring 类型的项目这么做!类似 MyBatisPlus 的开发过程,您需要定义 ES 的索引实体类(最好内部含有和实体类相互转换的方法),并且继承 ElasticsearchRepository 得到操作接口 UserEsMapper,然后在 service 中您的接口,serviceImpl 中实现这些接口。
这种开发模式和我们以往的开发一模一样,在 UserEsMapper 中已经实现好了大部分可直接使用的 CURD 方法,我们可以先来编写一个接口用来查询用户,不过我们主要是为了分词查询,数据我们自己导入,所以实际上 UserEsMapper 在我们的服务中几乎对内提供全量导入和增量导入。而日常查询接口的编写中,我们依旧使用 ElasticsearchRestTemplate 来进行接口开发。
ok 基本的内容都有了,开始编写代码。
curl -u elastic:Qwe54188_ -X DELETE "http://localhost:9200/user_v1"

curl -u elastic:Qwe54188_ -X PUT "http://127.0.0.1:9200/user_v1" \
  -H 'Content-Type: application/json' \
  -d '{
    "aliases": {
      "user": {}
    },
    "mappings": {
      "properties": {
        "account": {
          "type": "text",
          "analyzer": "ik_max_word",
          "search_analyzer": "ik_smart",
          "index": true
        },
        "wx_union": {
          "type": "keyword",
          "index": true
        },
        "mp_open": {
          "type": "keyword",
          "index": true
        },
        "email": {
          "type": "keyword",
          "index": true
        },
        "phone": {
          "type": "keyword",
          "index": true
        },
        "ident": {
          "type": "keyword",
          "index": true
        },
        "passwd": {
          "type": "keyword",
          "index": false
        },
        "avatar": {
          "type": "keyword",
          "index": false
        },
        "tags": {
          "type": "keyword",
          "index": true
        },
        "nick": {
          "type": "text",
          "analyzer": "ik_max_word",
          "search_analyzer": "ik_smart",
          "index": true
        },
        "name": {
          "type": "text",
          "analyzer": "ik_max_word",
          "search_analyzer": "ik_smart",
          "index": true
        },
        "profile": {
          "type": "text",
          "analyzer": "ik_max_word",
          "search_analyzer": "ik_smart",
          "index": true
        },
        "birthday": {
          "type": "date",
          "format": "yyyy-MM-dd",
          "index": true
        },
        "country": {
          "type": "keyword",
          "index": true
        },
        "address": {
          "type": "text",
          "analyzer": "ik_max_word",
          "search_analyzer": "ik_smart",
          "index": true
        },
        "role": {
          "type": "integer",
          "index": true
        },
        "level": {
          "type": "integer",
          "index": true
        },
        "gender": {
          "type": "integer",
          "index": true
        },
        "deleted": {
          "type": "keyword",
          "index": true
        },
        "create_time": {
          "type": "date",
          "format": "yyyy-MM-dd HH:mm:ss"
          "index": true
        },
        "update_time": {
          "type": "date",
          "format": "yyyy-MM-dd HH:mm:ss"
          "index": true
        }
      }
    }
  }'

curl -u elastic:Qwe54188_ -X GET "http://127.0.0.1:9200/user_v1/_mapping?pretty"
package cn.com.edtechhub.workusercentre.mapper;
import cn.com.edtechhub.workusercentre.model.entity.UserEs;
import org.springframework.data.elasticsearch.repository.ElasticsearchRepository;
/**
* 用户映射(ES)
*
* @author <a href="https://github.com/limou3434">limou3434</a>
*/
public interface UserEsMapper extends ElasticsearchRepository<UserEs, Long> {
}我们需要先来写全量更新的程序和增量更新的程序,不然 MySQL 没有导入数据到 ES 中的话,ES 无法进行分词。
package cn.com.edtechhub.workusercentre.job.once;

import cn.com.edtechhub.workusercentre.mapper.UserEsMapper;
import cn.com.edtechhub.workusercentre.model.entity.User;
import cn.com.edtechhub.workusercentre.model.entity.UserEs;
import cn.hutool.core.collection.CollUtil;
import lombok.extern.slf4j.Slf4j;
import org.springframework.jdbc.core.BeanPropertyRowMapper;
import org.springframework.jdbc.core.JdbcTemplate;
import org.springframework.stereotype.Component;

import javax.annotation.PostConstruct;
import javax.annotation.Resource;
import java.util.List;
import java.util.stream.Collectors;

/**
 * 全量同步用户到 ES
 *
 * @author <a href="https://github.com/limou3434">limou3434</a>
 */
@Component // 注释这个则关闭全量同步
@Slf4j
public class FullSyncUserToEs {

    /**
     * 注入 userEsMapper
     */
    @Resource
    private UserEsMapper userEsMapper;

    /**
     * 注入 jdbcTemplate
     */
    @Resource
    private JdbcTemplate jdbcTemplate;

    /**
     * 执行内容
     */
    @PostConstruct // 在 Spring 容器初始化后时执行一次
    public void run() {
        // 全量获取题目, 数据量不大的情况下使用
        String sql = "SELECT * FROM user";
        List<User> userList = jdbcTemplate.query(sql, new BeanPropertyRowMapper<>(User.class)); // 使用原生 JDBC 绕过逻辑删除避免无法同部到 ES

        log.debug("asdkljuugasd {}", userList);

        if (CollUtil.isEmpty(userList)) {
            return;
        }

        // 转为 ES 实体类
        List<UserEs> userEsList = userList.stream()
                .map(UserEs::EntityToMapping)
                .collect(Collectors.toList());

        // 分页批量插入到 ES
        final int pageSize = 10;
        int total = userEsList.size();

        log.debug("FullSyncUserToEs start, total {}", total);

        for (int i = 0; i < total; i += pageSize) {
            // 注意同步的数据下标不能超过总数据量
            int end = Math.min(i + pageSize, total);
            log.debug("sync from {} to {}", i, end);
            userEsMapper.saveAll(userEsList.subList(i, end));
        }

        log.debug("FullSyncUserToEs end, total {}, is {}", total, userEsList);
    }

}
package cn.com.edtechhub.workusercentre.job.cycle;
import cn.com.edtechhub.workusercentre.mapper.UserEsMapper;
import cn.com.edtechhub.workusercentre.model.entity.User;
import cn.com.edtechhub.workusercentre.model.entity.UserEs;
import lombok.extern.slf4j.Slf4j;
import org.springframework.jdbc.core.BeanPropertyRowMapper;
import org.springframework.jdbc.core.JdbcTemplate;
import org.springframework.scheduling.annotation.Scheduled;
import org.springframework.stereotype.Component;
import javax.annotation.Resource;
import java.sql.Timestamp;
import java.time.Instant;
import java.time.temporal.ChronoUnit;
import java.util.List;
import java.util.stream.Collectors;
/**
* 增量同步用户到 ES(每分钟一次)
*
* @author <a href="https://github.com/limou3434">limou3434</a>
*/
// todo 取消注释开启任务
@Component // 注释这个则关闭增量同步
@Slf4j
public class IncSyncUserToEs {
/**
* 注入 userEsMapper
*/
@Resource
private UserEsMapper userEsMapper;
/**
* 注入 jdbcTemplate
*/
@Resource
private JdbcTemplate jdbcTemplate;
/**
* 执行内容
*/
@Scheduled(fixedRate = 60 * 1000)
public void run() {
// 当前时间(UTC)
Instant now = Instant.now();
// 2 分钟前(UTC)
Instant fiveMinutesAgo = now.minus(2, ChronoUnit.MINUTES);
// 构建 SQL 语句
String sql = "SELECT * FROM user WHERE update_time >= ?"; //直接用 update_time 比较,无需转换(timestamp 默认是 UTC)
// 查询数据得到 2 分钟内被更新的数据(不过不包含直接被删除的记录)
List<User> userList = jdbcTemplate.query(
sql,
new BeanPropertyRowMapper<>(User.class),
Timestamp.from(fiveMinutesAgo)
);
// 转为 ES 实体类
List<UserEs> userEsList = userList.stream()
.map(UserEs::EntityToMapping)
.collect(Collectors.toList());
// 分页批量插入到 ES
final int pageSize = 10;
int total = userEsList.size();
if (total == 0) {
log.debug("IncSyncUserToEs no data...");
}
else {
log.debug("IncSyncUserToEs start, total {}", total);
for (int i = 0; i < total; i += pageSize) {
// 注意同步的数据下标不能超过总数据量
int end = Math.min(i + pageSize, total);
log.debug("sync from {} to {}", i, end);
userEsMapper.saveAll(userEsList.subList(i, end));
}
log.debug("IncSyncUserToEs end, total {}, is {}", total, userEsList);
}
}
}您可以使用下面的 json 进行查看是否全量更新。
GET /user/_search
{
  "from": 0,
  "size": 30,
  "query": {
    "match_all": {}
  }
}
然后我们需要编写索引实体,对照我们之前使用 MyBatisPlus 生成的实体类来编写。
package cn.com.edtechhub.workusercentre.model.entity;

import com.baomidou.mybatisplus.annotation.*;

import java.io.Serializable;
import java.util.Date;
import lombok.Data;

/**
 * 用户实体
 *
 * @author <a href="https://github.com/limou3434">limou3434</a>
 */
@TableName(value ="user")
@Data
public class User implements Serializable {
    /**
     * 本用户唯一标识(业务层需要考虑使用雪花算法用户标识的唯一性)
     */
    @TableId(type = IdType.ASSIGN_ID) // 手动添加雪花算法
    private Long id;

    /**
     * 账户号(业务层需要决定某一种或多种登录方式, 因此这里不限死为非空)
     */
    private String account;

    /**
     * 微信号
     */
    private String wxUnion;

    /**
     * 公众号
     */
    private String mpOpen;

    /**
     * 邮箱号
     */
    private String email;

    /**
     * 电话号
     */
    private String phone;

    /**
     * 身份证
     */
    private String ident;

    /**
     * 用户密码(业务层强制刚刚注册的用户重新设置密码, 交给用户时默认密码为 123456, 并且加盐密码)
     */
    private String passwd;

    /**
     * 用户头像(业务层需要考虑默认头像使用 cos 对象存储)
     */
    private String avatar;

    /**
     * 用户标签(业务层需要 json 数组格式存储用户标签数组)
     */
    private String tags;

    /**
     * 用户昵称
     */
    private String nick;

    /**
     * 用户名字
     */
    private String name;

    /**
     * 用户简介
     */
    private String profile;

    /**
     * 用户生日
     */
    private String birthday;

    /**
     * 用户国家
     */
    private String country;

    /**
     * 用户地址
     */
    private String address;

    /**
     * 用户角色(业务层需知 -1 为封号, 0 为用户, 1 为管理, ...)
     */
    private Integer role;

    /**
     * 用户等级(业务层需知 0 为 level0, 1 为 level1, 2 为 level2, 3 为 level3, ...)
     */
    private Integer level;

    /**
     * 用户性别(业务层需知 0 为未知, 1 为男性, 2 为女性)
     */
    private Integer gender;

    /**
     * 是否删除(0 为未删除, 1 为已删除)
     */
    @TableLogic
    private Integer deleted; // 手动修改为逻辑删除

    /**
     * 创建时间(受时区影响)
     */
    private Date createTime;

    /**
     * 更新时间(受时区影响)
     */
    private Date updateTime;

    @TableField(exist = false)
    private static final long serialVersionUID = 1L;

    @Override
    public boolean equals(Object that) {
        if (this == that) {
            return true;
        }
        if (that == null) {
            return false;
        }
        if (getClass() != that.getClass()) {
            return false;
        }
        User other = (User) that;
        return (this.getId() == null ? other.getId() == null : this.getId().equals(other.getId()))
            && (this.getAccount() == null ? other.getAccount() == null : this.getAccount().equals(other.getAccount()))
            && (this.getWxUnion() == null ? other.getWxUnion() == null : this.getWxUnion().equals(other.getWxUnion()))
            && (this.getMpOpen() == null ? other.getMpOpen() == null : this.getMpOpen().equals(other.getMpOpen()))
            && (this.getEmail() == null ? other.getEmail() == null : this.getEmail().equals(other.getEmail()))
            && (this.getPhone() == null ? other.getPhone() == null : this.getPhone().equals(other.getPhone()))
            && (this.getIdent() == null ? other.getIdent() == null : this.getIdent().equals(other.getIdent()))
            && (this.getPasswd() == null ? other.getPasswd() == null : this.getPasswd().equals(other.getPasswd()))
            && (this.getAvatar() == null ? other.getAvatar() == null : this.getAvatar().equals(other.getAvatar()))
            && (this.getTags() == null ? other.getTags() == null : this.getTags().equals(other.getTags()))
            && (this.getNick() == null ? other.getNick() == null : this.getNick().equals(other.getNick()))
            && (this.getName() == null ? other.getName() == null : this.getName().equals(other.getName()))
            && (this.getProfile() == null ? other.getProfile() == null : this.getProfile().equals(other.getProfile()))
            && (this.getBirthday() == null ? other.getBirthday() == null : this.getBirthday().equals(other.getBirthday()))
            && (this.getCountry() == null ? other.getCountry() == null : this.getCountry().equals(other.getCountry()))
            && (this.getAddress() == null ? other.getAddress() == null : this.getAddress().equals(other.getAddress()))
            && (this.getRole() == null ? other.getRole() == null : this.getRole().equals(other.getRole()))
            && (this.getLevel() == null ? other.getLevel() == null : this.getLevel().equals(other.getLevel()))
            && (this.getGender() == null ? other.getGender() == null : this.getGender().equals(other.getGender()))
            && (this.getDeleted() == null ? other.getDeleted() == null : this.getDeleted().equals(other.getDeleted()))
            && (this.getCreateTime() == null ? other.getCreateTime() == null : this.getCreateTime().equals(other.getCreateTime()))
            && (this.getUpdateTime() == null ? other.getUpdateTime() == null : this.getUpdateTime().equals(other.getUpdateTime()));
    }

    @Override
    public int hashCode() {
        final int prime = 31;
        int result = 1;
        result = prime * result + ((getId() == null) ? 0 : getId().hashCode());
        result = prime * result + ((getAccount() == null) ? 0 : getAccount().hashCode());
        result = prime * result + ((getWxUnion() == null) ? 0 : getWxUnion().hashCode());
        result = prime * result + ((getMpOpen() == null) ? 0 : getMpOpen().hashCode());
        result = prime * result + ((getEmail() == null) ? 0 : getEmail().hashCode());
        result = prime * result + ((getPhone() == null) ? 0 : getPhone().hashCode());
        result = prime * result + ((getIdent() == null) ? 0 : getIdent().hashCode());
        result = prime * result + ((getPasswd() == null) ? 0 : getPasswd().hashCode());
        result = prime * result + ((getAvatar() == null) ? 0 : getAvatar().hashCode());
        result = prime * result + ((getTags() == null) ? 0 : getTags().hashCode());
        result = prime * result + ((getNick() == null) ? 0 : getNick().hashCode());
        result = prime * result + ((getName() == null) ? 0 : getName().hashCode());
        result = prime * result + ((getProfile() == null) ? 0 : getProfile().hashCode());
        result = prime * result + ((getBirthday() == null) ? 0 : getBirthday().hashCode());
        result = prime * result + ((getCountry() == null) ? 0 : getCountry().hashCode());
        result = prime * result + ((getAddress() == null) ? 0 : getAddress().hashCode());
        result = prime * result + ((getRole() == null) ? 0 : getRole().hashCode());
        result = prime * result + ((getLevel() == null) ? 0 : getLevel().hashCode());
        result = prime * result + ((getGender() == null) ? 0 : getGender().hashCode());
        result = prime * result + ((getDeleted() == null) ? 0 : getDeleted().hashCode());
        result = prime * result + ((getCreateTime() == null) ? 0 : getCreateTime().hashCode());
        result = prime * result + ((getUpdateTime() == null) ? 0 : getUpdateTime().hashCode());
        return result;
    }

    @Override
    public String toString() {
        StringBuilder sb = new StringBuilder();
        sb.append(getClass().getSimpleName());
        sb.append(" [");
        sb.append("Hash = ").append(hashCode());
        sb.append(", id=").append(id);
        sb.append(", account=").append(account);
        sb.append(", wxUnion=").append(wxUnion);
        sb.append(", mpOpen=").append(mpOpen);
        sb.append(", email=").append(email);
        sb.append(", phone=").append(phone);
        sb.append(", ident=").append(ident);
        sb.append(", passwd=").append(passwd);
        sb.append(", avatar=").append(avatar);
        sb.append(", tags=").append(tags);
        sb.append(", nick=").append(nick);
        sb.append(", name=").append(name);
        sb.append(", profile=").append(profile);
        sb.append(", birthday=").append(birthday);
        sb.append(", country=").append(country);
        sb.append(", address=").append(address);
        sb.append(", role=").append(role);
        sb.append(", level=").append(level);
        sb.append(", gender=").append(gender);
        sb.append(", deleted=").append(deleted);
        sb.append(", createTime=").append(createTime);
        sb.append(", updateTime=").append(updateTime);
        sb.append(", serialVersionUID=").append(serialVersionUID);
        sb.append("]");
        return sb.toString();
    }
}
package cn.com.edtechhub.workusercentre.model.entity;
import cn.hutool.core.collection.CollUtil;
import cn.hutool.json.JSONUtil;
import com.baomidou.mybatisplus.annotation.TableField;
import com.baomidou.mybatisplus.core.toolkit.StringUtils;
import lombok.Data;
import lombok.extern.slf4j.Slf4j;
import org.springframework.beans.BeanUtils;
import org.springframework.data.annotation.Id;
import org.springframework.data.elasticsearch.annotations.Document;
import org.springframework.data.elasticsearch.annotations.Field;
import org.springframework.data.elasticsearch.annotations.FieldType;
import java.io.Serializable;
import java.util.Date;
import java.util.List;
/**
* 用户索引
*/
@Document(indexName = "user")
@Data
@Slf4j
public class UserEs implements Serializable {
private static final String DATE_TIME_PATTERN = "yyyy-MM-dd HH:mm:ss";
/**
* 本用户唯一标识(业务层需要考虑使用雪花算法用户标识的唯一性)
*/
@Id
private Long id;
/**
* 账户号(业务层需要决定某一种或多种登录方式, 因此这里不限死为非空)
*/
@Field(name = "account") // 显式指定 ES 字段名, 避免字段风格不一致
private String account;
/**
* 微信号
*/
@Field(name = "wx_union") // 显式指定 ES 字段名, 避免字段风格不一致
private String wxUnion;
/**
* 公众号
*/
@Field(name = "mp_open") // 显式指定 ES 字段名, 避免字段风格不一致
private String mpOpen;
/**
* 邮箱号
*/
@Field(name = "email") // 显式指定 ES 字段名, 避免字段风格不一致
private String email;
/**
* 电话号
*/
@Field(name = "phone") // 显式指定 ES 字段名, 避免字段风格不一致
private String phone;
/**
* 身份证
*/
@Field(name = "ident") // 显式指定 ES 字段名, 避免字段风格不一致
private String ident;
/**
* 用户密码(业务层强制刚刚注册的用户重新设置密码, 交给用户时默认密码为 123456, 并且加盐密码)
*/
@Field(name = "passwd") // 显式指定 ES 字段名, 避免字段风格不一致
private String passwd;
/**
* 用户头像(业务层需要考虑默认头像使用 cos 对象存储)
*/
@Field(name = "avatar") // 显式指定 ES 字段名, 避免字段风格不一致
private String avatar;
/**
* 用户标签(业务层需要 json 数组格式存储用户标签数组)
*/
@Field(name = "tags") // 显式指定 ES 字段名, 避免字段风格不一致
private List<String> tags; // 修改以支持数组查询
/**
* 用户昵称
*/
@Field(name = "nick") // 显式指定 ES 字段名, 避免字段风格不一致
private String nick;
/**
* 用户名字
*/
@Field(name = "name") // 显式指定 ES 字段名, 避免字段风格不一致
private String name;
/**
* 用户简介
*/
@Field(name = "profile") // 显式指定 ES 字段名, 避免字段风格不一致
private String profile;
/**
* 用户生日
*/
@Field(name = "birthday") // 显式指定 ES 字段名, 避免字段风格不一致
private String birthday;
/**
* 用户国家
*/
@Field(name = "country") // 显式指定 ES 字段名, 避免字段风格不一致
private String country;
/**
* 用户地址
*/
@Field(name = "address") // 显式指定 ES 字段名, 避免字段风格不一致
private String address;
/**
* 用户角色(业务层需知 -1 为封号, 0 为用户, 1 为管理, ...)
*/
@Field(name = "role") // 显式指定 ES 字段名, 避免字段风格不一致
private Integer role;
/**
* 用户等级(业务层需知 0 为 level0, 1 为 level1, 2 为 level2, 3 为 level3, ...)
*/
@Field(name = "level") // 显式指定 ES 字段名, 避免字段风格不一致
private Integer level;
/**
* 用户性别(业务层需知 0 为未知, 1 为男性, 2 为女性)
*/
@Field(name = "gender") // 显式指定 ES 字段名, 避免字段风格不一致
private Integer gender;
/**
* 是否删除(0 为未删除, 1 为已删除)
*/
@Field(name = "deleted") // 显式指定 ES 字段名, 避免字段风格不一致
private Integer deleted; // 手动修改为逻辑删除
/**
* 创建时间(受时区影响)
*/
@Field(name = "create_time", type = FieldType.Date, format = {}, pattern = DATE_TIME_PATTERN)
// 显式指定 ES 字段名, 避免字段风格不一致
private Date createTime;
/**
* 更新时间(受时区影响)
*/
@Field(name = "update_time", type = FieldType.Date, format = {}, pattern = DATE_TIME_PATTERN)
// 显式指定 ES 字段名, 避免字段风格不一致
private Date updateTime;
@TableField(exist = false)
private static final long serialVersionUID = 1L;
/**
* 对象转包装类
*/
public static UserEs EntityToMapping(User user) {
// 拷贝字段
if (user == null) {
return null;
}
UserEs userEs = new UserEs();
BeanUtils.copyProperties(user, userEs);
// 处理数组字段, 避免纯粹的 JSON 字符无法兼容 ES
String tags = user.getTags();
if (StringUtils.isNotBlank(tags)) {
userEs.setTags(JSONUtil.toList(tags, String.class)); // 快速把 json 数组字符转为数组
}
return userEs;
}
/**
* 包装类转对象
*/
public static User MappingToEntity(UserEs userEs) {
if (userEs == null) {
return null;
}
User user = new User();
BeanUtils.copyProperties(userEs, user);
// 处理数组字段, 避免纯粹的 JSON 字符无法兼容 ES
List<String> tagList = userEs.getTags();
if (CollUtil.isNotEmpty(tagList)) {
user.setTags(JSONUtil.toJsonStr(tagList)); // 快速把数组转为 json 数组字符
}
return user;
}
}然后定义接口服务。
public interface UserService extends IService<User> {
   /**
     * 用户查询服务(ES)
     */
    List<User> userSearchEs(UserSearchRequest userSearchRequest);
}@Service
@Slf4j
public class UserServiceImpl extends ServiceImpl<UserMapper, User> implements UserService {
private NativeSearchQuery getQueryWrapperEs(UserSearchRequest userSearchRequest) {
// 获取参数
Long id = userSearchRequest.getId();
String account = userSearchRequest.getAccount();
String tags = userSearchRequest.getTags();
String nick = userSearchRequest.getNick();
String name = userSearchRequest.getName();
String profile = userSearchRequest.getProfile();
String address = userSearchRequest.getAddress();
int pageCurrent = userSearchRequest.getPageCurrent() - 1; // 这里需要减 1 以适配 ES 的分页
int pageSize = userSearchRequest.getPageSize();
String sortField = userSearchRequest.getSortField();
String sortOrder = userSearchRequest.getSortOrder();
List<String> tagsList = JSONUtil.toList(tags, String.class); // 一行代码转换
// 构造查询条件
BoolQueryBuilder boolQueryBuilder = QueryBuilders.boolQuery();
// 过滤
boolQueryBuilder.filter(QueryBuilders.termQuery("deleted", 0));
if (id != null) {
boolQueryBuilder.filter(QueryBuilders.termQuery("id", id));
}
// 查询
if (StringUtils.isNotBlank(account)) {
boolQueryBuilder.filter(QueryBuilders.matchQuery("account", account));
}
if (CollUtil.isNotEmpty(tagsList)) {
for (String tag : tagsList) {
boolQueryBuilder.filter(QueryBuilders.termQuery("tags", tag));
}
}
if (StringUtils.isNotBlank(nick)) {
boolQueryBuilder.filter(QueryBuilders.matchQuery("nick", nick));
}
if (StringUtils.isNotBlank(name)) {
boolQueryBuilder.filter(QueryBuilders.matchQuery("name", name));
}
if (StringUtils.isNotBlank(profile)) {
boolQueryBuilder.filter(QueryBuilders.matchQuery("profile", profile));
}
if (StringUtils.isNotBlank(address)) {
boolQueryBuilder.filter(QueryBuilders.matchQuery("address", address));
}
// 分页
PageRequest pageRequest = PageRequest.of(pageCurrent, pageSize);
// 构造查询
return new NativeSearchQueryBuilder()
.withQuery(boolQueryBuilder)
.withPageable(pageRequest)
.build();
}
}最后就是控制层。
@RestController // 返回值默认为 json 类型
@RequestMapping("/user")
@Slf4j
public class UserController {
    /**
     * 查询用户网络接口
     */
    @SaCheckLogin
    @SaCheckRole("admin")
    @PostMapping("/search/es")
    @SentinelResource(value = "userSearchEs")
    public BaseResponse<List<UserVO>> userSearchEs(@RequestBody UserSearchRequest userSearchRequest) {
        List<User> userList = userService.userSearchEs(userSearchRequest);
        List<UserVO> userVoList = userList.stream()
                .map(UserVO::removeSensitiveData)
                .collect(Collectors.toList());
        return TheResult.success(CodeBindMessage.SUCCESS, userVoList);
    }
}
待补充...
4.深入学习
待补充...